Evaporation & Condensation
Unit with activities & plans
Questioning is the foundation of all learning.
The first step in rejecting not knowing is to ask, why?
Sweetland
Overview
- Overview
- Big ideas, concepts, facts, & outcomes
- Science content concepts & outcomes
- Inquiry & science process concepts
- Pedagogical overview
- Activities sequence
- Focus questions
- Materials
- Scoring guide suggestions
- Unit activity sequence
- Activity 1 - Water, Water Everywhere and not a Drop to Drink
- Activity 2 - Lose Some Weight - Evaporate
- Activity 3 - Dew Drop Inn
- Activity 4 - Frosty the Snow Can
- Activity 5 - Evaporation - A Paint Sensation
- Activity 6 - Evaporation
- Activity 7 - Condensation
- Lab notes
- Lab note 1 - Water, Water Everywhere and not a Drop to Drink
- Lab note 2 - Lose Some Weight - Evaporate
- Lab note 3 - Dew Drop Inn
- Lab note 4 - Frosty the Snow Can
- Lab note 5 - Evaporation - A Paint Sensation
- Lab note 6 - Evaporation
- Lab note 7 - Condensation
- Support materials
A sequence of plans to facilitate a review and develop a deeper understanding of evaporation and condensation. Includes a framing task, teacher plans, activities, and a journal for lab notes.
Background resources:
This plan is designed for learners who have very little prior knowledge of
Related study topics:
- Water cycle
- Enviornmental science - water cycle as an environmental factor in an ecosystem ctiity 7-11.
- Weather
- Weather
- Watershed
Planning information
Learner background information
A plan designed for learners who have prior knowledge in cause and effect, use of observations to make inferences, models as explanations for observble and non observable events, and working in groups.
Intended learnings & learners thinkings
See for more information on what to include in general planning
Content concepts or outcomes
(Source concepts & misconceptions)
Big ideas and specific outcomes:
- Understanding moisture is a property air is useful in explain much about our environment. From dew on our car, to frost in the winter, to condensation inside our house which can be obtimized for our health or create unhealthy hazards with the growth of mold. Additinally the water cycle is essential for life on Earth. Understanding that water changes states from a liquid to a gas through the processes of evaporation and condensation is necessary supporting information to really understand the water cycle and the transfer of energy that creates our changes in weather.
Concepts and facts
- Humidity is the amount of water in the air.
- Humidity affects our comfort in an environment.
- Humidity affects the quality of environment for the organism that live their.
- Humidity affects the weather in beneficial and disasterous ways.
Outcome
Relate humidity and its effects on our quality of life.
Science concepts: physical, earth, life
Big ideas:
Evaporation is the process that changes a liquid to a gas and different liquids may evaporate at different rates. Condensation is the process in which a gas changes into a liquid. It will depend on the temperature on how these activities work.
Related concepts
- Evaporation is a liquid changing into a gas when it is heated.
- Condensation is a gas changing into a liquid when it cools.
- Dew point is the temperature at which condensation will occur.
- Warmer air can hold more water vapor than cold air.
- Humidity is the amount of water vapor in the air.
- Precipitation can be of different sizes.
- Precipitation (rain, drizzle, sleet, snow, hail, virga) is a result of the water cycle.
- Condensation, evaporation, transpiration, sublimation, deposition, are processes of changing state between liquid and gas.
- A variety of variables affect the rate of evaporation (amount of heat, surface area, humidity, wind speed, air pressure) and condensation.
- Evaporation and condensation result in an energy transfer.
- Contrails are condensation trails from high aircraft. Created when moist warm air from the aircraft exhaust is quickly chilled.
Outcome
- Explan water will evaporate from a liquid and change state into a gas when it is heated.
- Explan water will condense from a gas and change state into a liquid when it cools.
Anticipated learner thinkings & misconceptions
- Believe all water will soak into the soil or the surface it is on.
- Think water on the ground, dew, came from rain.
- Think water on the shower mirror was splashed from the sshower head.
- Matter is not conserved, it disappears or appears during processes such as dissolving, burning, evaporation, boiling, rotting, respiration, rusting, condensation, and growth of plants.
Inquiry, process, & cross cutting concepts & skills
Inquiry
- When I experiment I collect observations that describe how different properties change (become variables) when objects and systems interact. This helps me make claims, explain what is happening, and to predict what might happen in the future.
- Inquiry concepts
- Process concepts
- Perspective concepts
Related concepts and facts
- Observational data and reasoning is used to explain interactions. Evidence is something that is observed and can be used to understand what is happening by making inferences to explain cause and effect and to make predictions about future changes.
- Observations are information we sense.
- Inferences are explanations for cause and effect based on observations.
- Models are structures that correspond to real objects, events, or classes of
events.
- Explanations are based on observation derived from experience or experimentation and are understandable.
- Pictures or symbols represent objects.
Outcome -
- Explain how the evidence supports evaporation and condensation as a physical changes of state related to the temperature of water, air , surface, and involves an energy transfer.
Specific outcomes -
- Use observable evidence to explain change related to cause and effect.
Other possible concepts
History of science and development of technology - perspective of science
See also Concepts & misconceptions also science, math, technology timeline
- People have practiced science and technology for a long time.
- Science develops over time.
- Science investigators such as
Scoring guides suggestions (rubric)
(scoring guide)
Top level
- Liquid water will evaporate (change from a liquid to gas) when it is heated and change to gas particles and move into the air. The water gas particles can be cooled and change to liquid water.
- Water appears on some surfaces like windows, mirrors, grass,
- Water disappears when it is spilled on a surface.
Lower level
Strategies to achieve educational learnings
Based on learning cycle theory & method
Instructional Procedure
Pedagogical Overview
Activities Sequence to provide sufficient opportunities for students to achieve the targeted outcomes.
Make sure learners have the prior knowledge identified in the background information.
Framing task to introduce the core idea, question, as a challenge to act as an anchor to revisit and connect the evaporation activities for learning throughout the unit and culminate in a deeper understanding; of evporation as an essential part the water cycle.
- Activity 1 - Water, Water Everywhere and not a Drop to Drink
- Activity 2 - Lose Some Weight - Evaporate
- Activity 3 - Dew Drop Inn
- Activity 4 - Frosty the Snow Can
- Activity 5 - Evaporation - A Paint Sensation
- Activity 6 - Evaporation
- Activity 7 - Condensation
Focus question
Unit focus question:
What happens to rain water after it rains?
Sub focus questions:
- What happens when water disappears?
- What happens when water collects on windws, grass, cars, mirrors, ... ?
Materials
- Sidewalk chalk, camera, large bowl, heavy glass cup, (shorter than the bowl is deep) teaspoon, clear plastic wrap, clear cellophane tape, masking tape, penny, blue food coloring, newspaper, paper towels, salt, medium plastic cups, 2 disposable smaller paper or plastic cups, 1 straight pin, 1 plastic drinking straw, rubbing alcohol, water, metric ruler, scissors, safety goggles, clear glass jar with lid, thermometer, hot water from the tap, or microwave ahead of time, clean, empty metal food can (label removed), crushed ice or small ice cubes, white notebook or typing paper, pencil, rubbing alcohol, water, paper cups, crushed holiday egg dye tablets, cotton swabs, plates, (not paper) one purple, orange, black crayon, (for each group) water, sponge, measuring cup, humidity detector

- Lab note 1 - Water, Water Everywhere and not a Drop to Drink
- Lab note 2 - Lose Some Weight - Evaporate
- Lab note 3 - Dew Drop Inn
- Lab note 4 - Frosty the Snow Can
- Lab note 5 - Evaporation - A Paint Sensation
- Lab note 6 - Evaporation
- Lab note 7 - Condensation
Resources
Lesson Plans
Preactivity or framing task for the unit
A framing task to introduce the core idea, question, as a challenge to act as an anchor to revisit and connect the evaporation activities for learning throughout the unit and culminate in a deeper understanding of evporation; as an essential part the water cycle.
Materials
- Rainstorm that creates a puddle to measure how it disappears.
- Outdoor puddle, sidewalk chalk, camera
- Lab note -
Focus questions:
- What happens to ran water after it rains?
Learning outcomes:
- A challenge activity to focus the other activities in the unit on Earth and environmental phenomen for evaporation and condensation.
Suggested procedures overview:
- Put learners in groups, focus their attention, and assess their initial understanding of the focus questions.
- Activity - Observe the demonstration and explain salt, food coloring, and other particles are suspended in water and when water evaporates the suspended particles don't go with it.
Exploration -
- Put learners in pairs.
- Ask. What happens to rain water after it rains? Accept all answers without comment on accuracy.
- List all answers on Lab note
- Listen to the responses. Do not comment on accuracy.
- Ask. How can we find out? Accept all answers without comment on accuracy.
- If there are puddles after a rain, suggest they can observe it and see what happens.
- Select or make a puddle. Preferably on asphalt or concrete so they can mark where the water ends every hour or so. If you are familiar with a playground or space where water puddles, it can be easy to use a few gallons of water to create a puddle if the weather isn't cooperative. Alternatively you could use a sheet of plastic to make an indoor puddle to use.
- Explain that you are going to view a puddle and record how it changes it's size by marking its outline with chalk every hour or 15 minutes depending on the kind of puddle and its location.
- Observe and collect data. Write their observations along with where they think the water is going. And map the puddle and how it decreases in size.
Invention -
- Review to catch up to date.
- Ask. What do you think happened to the water? Do not comment on accuracy. Record all ideas.
- How long did it take the rain water to disappear from the puddle?
- Explain this packet has activities to explore some possibilities of what happens.
- Exploration will continue with all the activities in the unit.
Invention will result with the useof the observations from the activities and discussions in all the activities in the unit from which explanations are created.
Discover
Discovery is relating the information from one activity to the next.
Activity 1 - Water, Water Everywhere and not a Drop to Drink
Materials
- Large bowl, heavy glass cup, (shorter than the bowl is deep) teaspoon, clear plastic wrap, clear cellophane tape, penny, blue food coloring, newspaper or paper towels, salt
- Lab note -
Focus questions:
- Is rain salty?
- What happens to the salt in ocean water when sea water evaporates?
Learning outcomes:
- Explain salt, food coloring, and other particles are suspended in water and when water evaporates the suspended particles don't go with it.
Suggested procedures overview:
- Put learners in groups, focus their attention, and assess their initial understanding of the focus questions.
- Activity - Observe the demonstration and explain salt, food coloring, and other particles are suspended in water and when water evaporates the suspended particles don't go with it.
Exploration -
- Put learners in pairs.
- Ask. Is rain salty? Accept all answers without comment on accuracy.
- Is rain over the ocean salty?
- Tell. Imagine that you are on a shipwrecked on a desert island in the middle of the ocean. You have no food and some supplies from you ship but not a single drop of drinking water. You have to figure out some way to make the salt water from the ocean safe to drink. What can you do?
- Listen to the responses. Do not comment on accuracy.
- Put tap water in a bowl to a depth of about 2 inches.
- Add ten drops of blue food coloring and 2 or 3 teaspoons of salt.
- Mix well, until salt is dissolved.
- THIS IS YOUR OCEAN
- Stand the heavy glass cup in the center of the bowl, so it is surrounded by the salt water.
- Put a loose covering of plastic food wrap over the top of the bowl.
- Tape the plastic wrap to the sides of the bowl so that no air can get in or out.
- Tape a coin or centicube to the outside of the plastic wrap directly over the center of the glass.
- Make sure that the weight makes the plastic wrap slant down toward the center of the glass.
- Put the bowl on a flat surface outside, where it will get a lot of sunshine. Or under a light that radiates heat.
- Check the bowl every hour for four hours.
- Have the learner's journal what they observe.
Invention -
- Explain and discuss with the learners
- Did you see any droplets of water on the bottom of the plastic wrap?
- How do you think the water got there?
- Take the plastic wrap off.
- What color is the water in the glass?
- What do you think happened to the blue food coloring?
- Make sure your hands are clean; dip your finger in the glass to get a drop or two of water on the tip of your finger?
- Taste the water.
- Is it salty?
- Record the results,
- Write an explanation in your own words.
Discover
Summarize how this relates to the framing task on your evaporation and condensation over all lab note.
Activity 2 - Lose Some Weight Evaporate!
Materials:
- 2 medium plastic cups, 2 disposable smaller paper or plastic cups, 1 straight pin, 1 plastic drinking straw, 1 paper towel, rubbing alcohol, water, metric ruler, scissors, tablespoon, safety goggles
- Lab note -
Focus questions:
Do different liquids evaporate the same?
Learning outcomes:
Observe different liquids evaporate and explain that different liquids evaporate differently.
Suggested procedures overview:
- Put students in groups, focus their attention, and assess their initial understanding of the focus questions.
- Activity - Observe alcohol and water evaporate and explain that alcohol evaporates faster than water.
Exploration
- Put learners in pairs.
- Accept all answers without comment on accuracy.
- Put on safety goggles.
- Measure the length of the straw, ask your partner to push the pin through the exact center of the straw.
- Stand the two large cups near each other on the table and rest the pin on the rims of the two cups.
- If the straw is not balanced you may need to adjust the pin.
- Pour about 1 tablespoons of water into one of the smaller cups.
- Have an adult pour 1 tablespoons of rubbing alcohol in the other small cup.
- Cut two strips of paper towels measuring 1 inch wide, and 6 inches long.
- Dip one strip in the alcohol and dip the other in the water.
- Make sure they are both completely wet.
- Touch strips on side of cup so some of the excess liquid comes off.
- Hang the strips on opposite sides of the straw.
- Move until the straw is balanced.
- Watch the straw as the water and the alcohol evaporate.
Invention
- Recall and review
- Which side seemed to be losing weight fastest?
- What is causing one side to lose faster than the other?
- Does water or alcohol evaporate faster?
- You saw the how water and alcohol evaporated at a different rate. That is an observation.
- Why do you think they did? accept all ...
- If it takes heat to evaporate liquids, what might explain the difference? They evaporate at different temperatures. If they don't compe up with this, ask. Do you think they might have different temperatures of evaporation.
- Record answer in science journal.
- How can you tell?
- Do a mini experiment or show a video of two pans on the stove. One on a burner that is turned on and one on a burner not turned. Let them watch as the water in the hot pan evaporates quickly and the other does appear to evaporate while watching.
- Ask. Was the temperature at the ends of the straw different or the same. same
- Then if the temperature was the same, maybe the only thing different is that alcohol evaporates at a lower temperature.
Discover
Summarize how this relates to the framing task on your evaporation and condensation over all lab note.
Ask. If different liquids can evaporate at different temperatures.
Could do more experiments with
- Puddles of water in the sun or light vs. in the shade or dark.
- Puddles of water on white or black surfaces.
- Water in different fabrics on a clothes line.
- Create another.
Activity 3 - Dew Drop Inn
Materials:
- Clear glass jar with lid, ice, water, thermometer, hot water from the tap, or microwave ahead of time, and save in a thermal container.
- Lab notes -
Focus questions:
Where does the water on a cold glass come from?
Learning outcomes:
- Explain that water will condense on a surface that is cold when warm moist air touches it.
Suggested procedures overview:
- Put students in groups, focus their attention, and assess their initial understanding of the focus questions.
- Activity - Consider the Dew drop inn challenge, observe the experiment, and infer that water will condense on a surface that is cold when warm moist air touches it as an explanation for condensation formation. May also explain the dew point.
Exploration
- Put learners in pairs.
- Accept all answers without comment on accuracy.
- The Dew Drop Inn has a problem…. Wet windows.
- In the winter it is colder outside the hotel than inside, and water forms on the inside of the windows. In the summer it is colder inside the hotel than outside, and water forms on the outside of the windows?
- Can you explain why?
- Record your thoughts in your science journals.
- Suggest. I know an experiment that may help you figure it out.
- Fill the jar half full with hot tap water.
- Put the lid on the jar and place it on the table.
- In a second jar, fill it half full with cold water and a few ice cubes.
- Put the lid on the jar and place it on the table with the warm water jar.
- Observe the jars.
Invention
- What happened to the outside of the jars?
- Observation - cold water had water on it, warm water didn't have water on the outside.
- Inference - the water leaked through the jar.
- Inference - the warm air outside touched the colder container and condensed.
- Was water forming inside the jar or outside?
- How can what you learned about evaporation and condensation, explain why?
- Write your answers in your lab journal.
- What jar is like - The Dew Drop Inn windows in the summer?
- How about winter?
- Explain
- Record answer in journal.
Discovery
Summarize how this relates to the framing task on your evaporation and condensation over all lab note.
Activity 4 - Frosty The Snow Can
Materials
- Clean empty metal food can (label removed), crushed ice or small ice cubes, salt, teaspoon, dishtowel, masking tape, spoon, thermometers.
- Lab notes -
Focus questions:
- How does frost get on objects in a freezer or a windshield in the winter?
Learning outcomes:
- Learners will use the idea of condensation to describe how water vapor in air can come in contact with a cold object, turn to water, and freeze; making frost or ice.
Suggested procedures overview:
- Put students in groups, focus their attention, and assess their initial understanding of the focus questions.
- Activity - Learners will observe the formation of ice on the cold can and infer the idea of condensation to describe how water vapor in air can come in contact with a cold object, turn to water, and freeze; making frost or ice.
Exploration
- Ask.
- In the "Dew Drop Inn," you saw how water molecules as a gas in the air would change into a liquid on the outside of a container if the container were cold enough.
- Lets find out what will happen if the container is really cold.
- What do you think will happen if the container is really cold? Accept all answers without comment on accuracy.
- Have students record why in their science journals.
- The following experiment will help you figure it out.
- Make sure that the tape is put around the top of the cans, so the sharp edges are covered.
- Dry out the inside of the can with the dishtowel.
- Place three teaspoons of salt into the can.
- Fill the can about half way with crushed ice.
- Add three more teaspoons of salt.
- Fill the can almost to the top with ice and another three teaspoons of salt.
- Hold the can near the top with the dish towel or glove and mix the ice-salt mixture with a spoon.
- Keep stirring until something happens on the side of the can.
Invention
- Ask. Did you notice any water on the outside of the can?
- Ask. What happened?
- Have the learners record their observations and inferences in their journals.
- Ask. How this might relate to frost on the ground.
- How might this related to frost on the packages in a freezer?
Discover
Summarize how this relates to the framing task on your evaporation and condensation over all lab note.
Activity 5 - A Paint Sensation
Materials:
- Newspaper, white notebook or typing paper, pencil, rubbing alcohol, water, 6 paper cups, crushed holiday egg dye tablets or food coloring, teaspoon, 6 cotton swabs, safety goggles one per person
- Lab notes -
Focus questions:
- What causes paint to dry? When the water or alcohol evaporate, the pigment and resin (glue) particles are pulled closer together. When the water or alcohol is gone, these particles are touching one another very tightly with the last of the water evaporated. Thus the particles stuck to one another make a coat of paint on the surface which was painted. Each particle still has its original chemistry, besides being stuck to the particle next to it. Otherwords there is no chemical change in this process.
Learning outcomes:
Use water and alcohol with coloring to model paint drying as the water and alcohol evaporate leaving behind the coloring particles as the paint and explain the process of evaporation as water or alcohol particles gain energy and change from a liquid to a solid and float of into the air - evaporate.
Suggested procedures overview:
- Put students in groups, focus their attention, and assess their initial understanding of the focus questions.
- Activity - Use water and alcohol with coloring to model paint drying as the water and alcohol evaporate leaving behind the coloring particles as the paint and explain the process of evaporation as water or alcohol particles gain energy and change from a liquid to a solid and float of into the air - evaporate.
Exploration
- Organize learners into pairs and groups.
- Ask. When you and your parents paint your house what process takes place for the paint to dry? Accept all answers without comment on accuracy.
- Have students record their guess in their science journals.
- The following experiment will help you figure it out.
- Spread newspaper over your work area.
- Put your safety goggles on.
- Pour the dye into one of the cups.
- Add food coloring or Crush each of the other dye tablets and put each into separate cups.
- Separate the cups into two groups.
- In one of the groups put 2 teaspoons of water into each cup and mark it with a W.
- In the other group have an adult put two teaspoons of rubbing alcohol into each cup and mark it with an A. (Make sure to replace the lid on the rubbing alcohol).
- Fold another piece of notebook or typing paper in half and draw the same picture on both sides.
- Use a cotton swab to paint one side using the paint from a cup marked W.
- Paint the other side with a cotton swab using the paint from a cup marked A.
- Ask. Think about what you learned in Lose Some Weight - Evaporate and predict which picture will dry first.
- Watch the paintings and see which dries first.
- Record what happens as observations and write you inferences for your explanations.
Invention
- Discuss what they observed and what inference they can make about evaporation.
- Ask.
- How did the temperture of the paper compare? Do you think that made a difference? no they were pretty much the same.
- How did the temperture at which they evaporate compare? Alcohol evaporate at alower temperature than water.
Discover
Summarize how this relates to the framing task on your evaporation and condensation over all lab note.
Activity 6 - Evaporation
Materials
- Plates, (See preparation notes) one purple, orange, black crayon, (for each group) water, sponge, measuring cup, thermometer, humidity detector (optional)
- Lab notes -
Preparation notes.
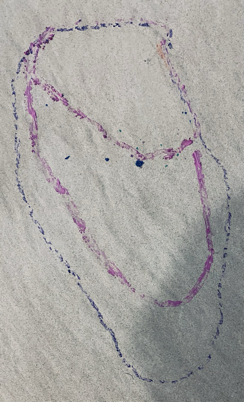
I really like the idea of drawing around the puddle as it would make a great artifact. However, I haven't found a reliable way to do it.
Some crayons work, but most are difficult to get to write on smooth surfaces.
If you use water based markers, they bleed when they touch water.
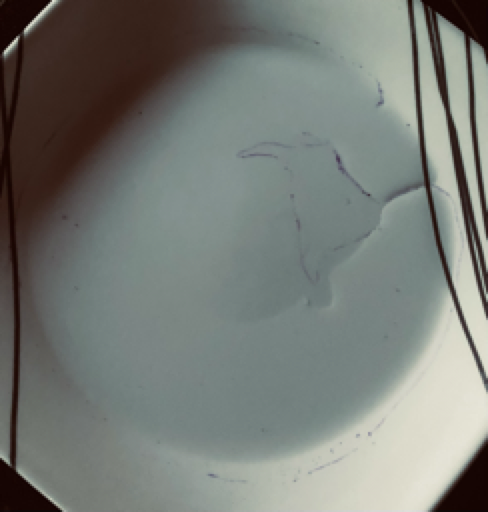
Below is a plate with the original outline. After a couple of hours, I tried to draw a second line, but I couldn't find a crayon that would write on the plate. So I decided to take a picture.
As you can see. The water in the bottom right is noticeable, but as you follow it around clockwise it becomes very hard or impossible to see where it stops.
It might work better if you add food coloring, but I really wanted to have a mapping of the water change on one plate or one sheet of paper. It might be easier to have learners draw it freehand.
Other things I tried are noted below.
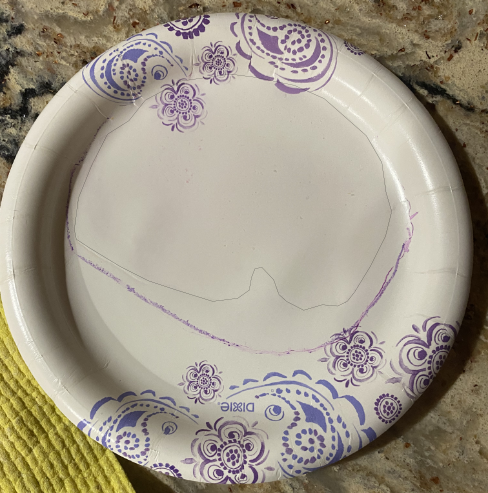
I traced the first outline around the water with a crayon just fine. Then a couple of hours later I couldn't get a different color of crayon to leave a mark and the plate warped so when I pressed harder on it the water puddle flowed toward where I tried to draw a second line as the plate was warped and would bend.
So I took a picture. I planned on taking pictures periodically, but as you can see the water is hard to see. To make it more noticable I altered the picture with a photo app so you could see how hard it is to see the water even when it is outlined with a black line.
Next I tried a ceramic tile, thinking it would be hard enough to press the crayon and get a mark.
However, the crayons are too wide to get a nice line whenit would draw on the surface,but most would slip on the ceramic, as they were waxy, and not draw. I was able to get three sets of lines, but I used the same color for the last two sets.
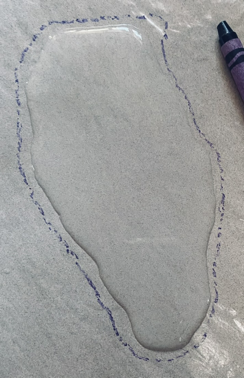
I also tried paper, thinking that it might soak up water, but dry from the outside in, but it went from a puddle mark to the whole sheet being damp so the paper would rip if you tried to mark where it looked wet.
Permanent markers might work, on plastic plates, but I didn't have them available.
Focus questions:
- How does water disappear differently?
Learning outcomes:
- Map the rate of water evaporation in different places and explain some inferences as what might have been different.
Suggested procedures overview:
- Put students in groups, focus their attention, and assess their initial understanding of the focus questions.
- Activity - Map the rate of water evaporation in different places and explain some inferences as what might have been different.
Exploration
- Organize learners into groups and pairs.
- Teacher wipes a wet sponge across the board.
- Have the learners watch and make observations about what happens.
- Ask where does the water on the board go? Accept all answers without comment on accuracy.
- What happens to puddles after it rains? Accept all answers without comment on accuracy.
- Where does the water go?Accept all answers without comment on accuracy.
- Have you ever seen clothes hung out to dry in the sun and wind?
- Where does that water go? Do not tell them if their answers are right or wrong at this point.
- Divide into partners.
- Give each pair a plate and three different colors of crayons.
- Have learners make a shallow puddle on their plates.
- They should make a purple circle around the puddle.
- Have each group put their plate in different parts of the room.
- Have the them make some predictions about what will happen to the puddles of water.
- Possible questions, Will the puddle be the same size, will it be larger or smaller, what if we left it in the spot for an hour?
- Check about an hour later, each pair should make an orange circle around their puddle. If it has changed any.
- Students can compare puddles.
- Have the pairs leave their plates in the same spot for another hour.
- During this time you may have them compare their predictions to what happened.
- Have them predict what they think will happen in another hour.
- Have them record that in their journals.
- Possible questions What will your puddles look like in an hour, what will happen to the water, where does it go, do you think there will be a puddle left?
- Have them check their puddles, and put a black circle around the puddle.
- Have the groups compare puddles.
- Have a discussion about what happened to the puddles, possible questions.
- Is there a difference in how fast the puddles are evaporating in the different parts of the room, Who's puddle shrunk fastest, or evaporated faster, where did the water go, what types of places help evaporation to happen faster?
- What did you think the puddle would look like in the morning if we leave it here all night?
- Have them record response in journal.
- The next day have pairs observe their plates.
Invention
- Regroup as a class and groups shoe their plates.
- Ask. What happened to the water, where did the water go, what is the name for water going from liquid to the air? evaporation
- How does this relate to when you are done taking a shower and you hang your towel up to dry?
Discover
Summarize how this relates to the framing task on your evaporation and condensation over all lab note.
Activity 7 - Condensation
Materials
- Glass jars, ice cubes, water, paper clips, 8-10 Petri dishes or shallow transparent plates, 4-5 tin lids, salt.
- Lab notes -
Focus questions:
- How can moisture affect objects in our environment?
Learning outcomes:
- Observe water in a closed system with salt and infer the water evaporated, created a high moisture atmosphere, and interacted with the salt
Suggested procedures overview:
- Put students in groups, focus their attention, and assess their initial understanding of the focus questions.
- Activity - Observe water in a closed system with salt and infer the water evaporated, created a high moisture atmosphere, and interacted with the salt.
Exploration
- Organize learners into groups and pairs.
- Ask. What are clouds? Accept all answers without comment on accuracy.
- How are they made? ccept all answers without comment on accuracy.
- Have you ever seen a cloud on the ground before?
- What is a cloud (fog) on the ground called?
- How is fog made?
- In the winter, when you walk outside, what happens to your breath when the cold air hits it? it looks like fog
- Record their answers in their science journals.
- The following experiment will help you figure it out.
- Remember in the Dew Drop Inn activity when filled the jar up with cold water.
- What did you observe on the outside of the jars? moisture
- Where might it have come from? the air
- Give each group two shallow dishes, two paper clips, and one tin lid.
- Have them place the paperclips in one of the shallow dishes
- Next have them set the tin lid on top of the paper clips.
- Have them place 6-10 salt crystals on the tin lid.
- The teacher will then pour a thin layer of water into each shallow dish making sure that the tin lid does not get any water on it.
- Then have each group place the other shallow dish on top of each set making sure that no water splashes onto the tin lid.
- Let the setup sit for up to a half hour.
- Ask. What do you think will happen?
Invention
- Regroup as a class and groups demonstrate their projects.
- Ask. What ahppened?
- What happened to the salt and why are there drops in the lid instead of salt? accept all answers. Hopefull some will mention that the water might have evaporated and was in the air above. From there if they don's suggest further, then say. DO you think that the water that evaporated from the dish might have created air with high humidity above the water. Then this water or humidity from in the air moved around and around bumped into the salt crystals causing each of them to dissolve.
- Record it in their science journals.
- Now all that is left is the water on the lid. How is this condensation?
- How does this relate to the fog when you wake up in the morning?
Discover
Summarize how this relates to the framing task on your evaporation and condensation over all lab note.
- Water cycle
- Enviornmental science - water cycle as an environmental factor in an ecosystem ctiity 7-11.
- Weather
- Weather
- Watershed
Lab Notes for activities
Lab note - Rain and what happens to it
Challenge
Write what you know about what happens to rain as it falls and after it lands the ground or other surface. Don't worry about the accuracy of your initial ideas. You will be provided opportunities to add more information as you explore the following activities.
When rain falls it
labNoteOverAll
Rain can land on the ground or other surface and it can
Lab notes 1 -
Materials
- Water, food coloring, small clear container, light that radiates heat, plastic wrap, centimeter cube
- Lab notes
Focus questions:
- Is rain salty?
- What happens to the salt in ocean water when sea water evaporates?
Challenge
Make a container with food coloring and salt. Cover it so the top sags, place it by the light, and let the water collect on the plastic wrap.
Draw before and after pictures to show what you observed (taste is an observation) that changed. Then write an inference for what you oberved.
Before observations
After observations --------------------------------------------and ---------- Inferences
Lab notes 2 -
Materials
- straw, pin, paper or plastic cup, strips of coffee filter or newsprint,
- Lab note
Focus questions:
- How does alcohol evaporate compared to water?
Challenge
Show how alcohol will evaporate compared to water.
Before observations
During observations --------------------------------------------and ---------- Inferences
After observations --------------------------------------------and ---------- Inferences
Lab notes 3 - The Dew Drop Inn
Materials
- Clear glass jar with lid, ice, water, thermometer
Focus questions:
- What causes water to form on windows?
Challenge
The Dew Drop Inn has a problem…. WET WINDOWS.
- In the winter it is colder outside the hotel than inside, and water forms on the inside of the windows.
- In the summer it is colder inside the hotel than outside, and water forms on the outside of the windows?
How can their problem of wet windows be solved?
Draw before and after pictures of the two jars and label them (hot water and ice water)
Before (observation) (temperature inside and outside the container)
After (observation)(temperature inside and outside the container)
Describe what changes you observed.
Write inferences to explain what you think happened in the Hot water
Write inferences to explain what you think happened in the Cold water
How does this compare to the Dew Drop Inn windows?
Summer
Winter
Lab notes 4 -
Materials
Clean empty metal food can (label removed), crushed ice or small ice cubes, salt, teaspoon, dishtowel, masking tape, spoon, thermometer.
Focus questions:
- How might ice be formed?
Challenge
Listen to and follow the directions to make salty ice water in the metal can and slowly stir it and see what will from on the outside of the can.
Draw before and after observations and write your inferences to explain the changes.
Before
After
Lab notes 5 -
Materials
- Plate, five different colors of crayons,
- Lab journal
Challenge
Map the rate of water evaporation and explain some inferences as what might ahve been different.
Lab notes 6 - Evaporation
Materials
- Plates, different colored crayons, thermometers,
Focus question
How does water disappear differently?
Challenge
Map the rate of water evaporation in different places and explain some inferences as what might have been different.
Draw a diagram of your plate and puddle of water that shows before, during, and after.
What are clouds?
What is your breath on cold days?
Lab notes 7 - Condensation
Materials
- Glass jars, ice cubes, water, paper clips, 8-10 Petri dishes or shallow transparent plates, 4-5 tin lids, salt.
Focus question
How can moisture affect objects in our environment?
Challenge
Make a model to demonstrate how moisture (water in the air) can interact with objects in our environment to change them.
Home: Pedagogy - theory, curriculum, learning, human development, & teaching
Home: Science - knowledge base, activities, pedagogical knowledge in all dimensions